The Sounding Canvas project integrates capacitive sensing technology with a Raspberry Pi 4 Model B for interactive sound generation. The core objective was to develop a system where touch or proximity to the canvas surface, detected by changes in capacitance, triggers corresponding audio output through connected speakers. This report details the hardware setup, software implementation, underlying electronics, and the progression from initial sensor testing to the final integrated artwork.
1. Project Overview and Goals
2. Hardware Architecture and Connections
2.1 Components:
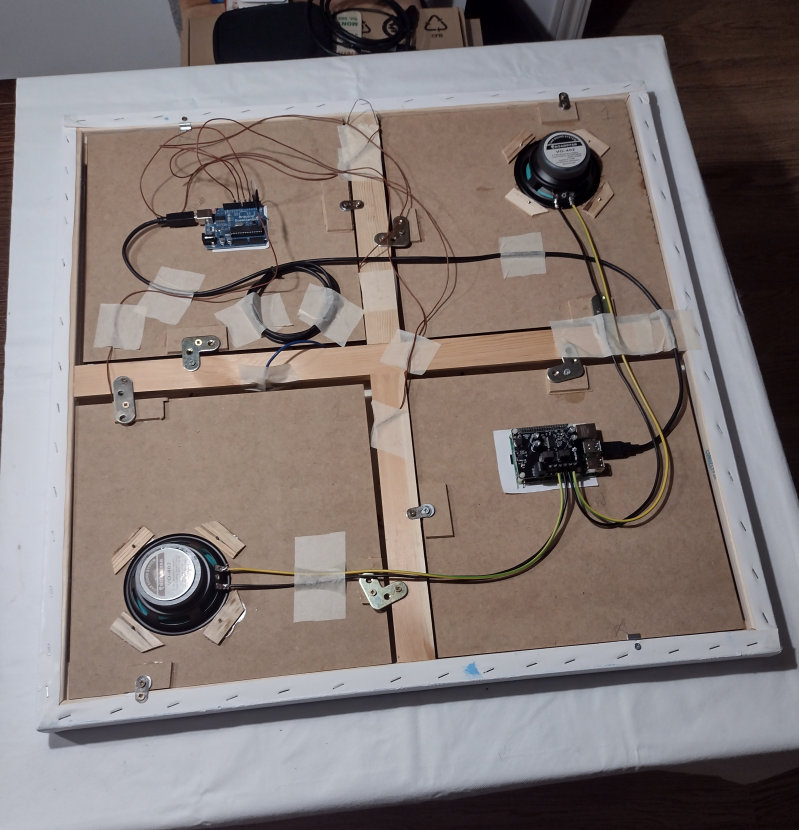
- Arduino Uno Rev 3 (or Duemilanove): Microcontroller responsible for reading capacitive sensor data and communicating with the Raspberry Pi via USB.
- Raspberry Pi 4 Model B with HiFiBerry Amp2 HAT: Single-board computer for audio processing, sound file playback, and amplification, powered through the HiFiBerry Amp2 HAT.
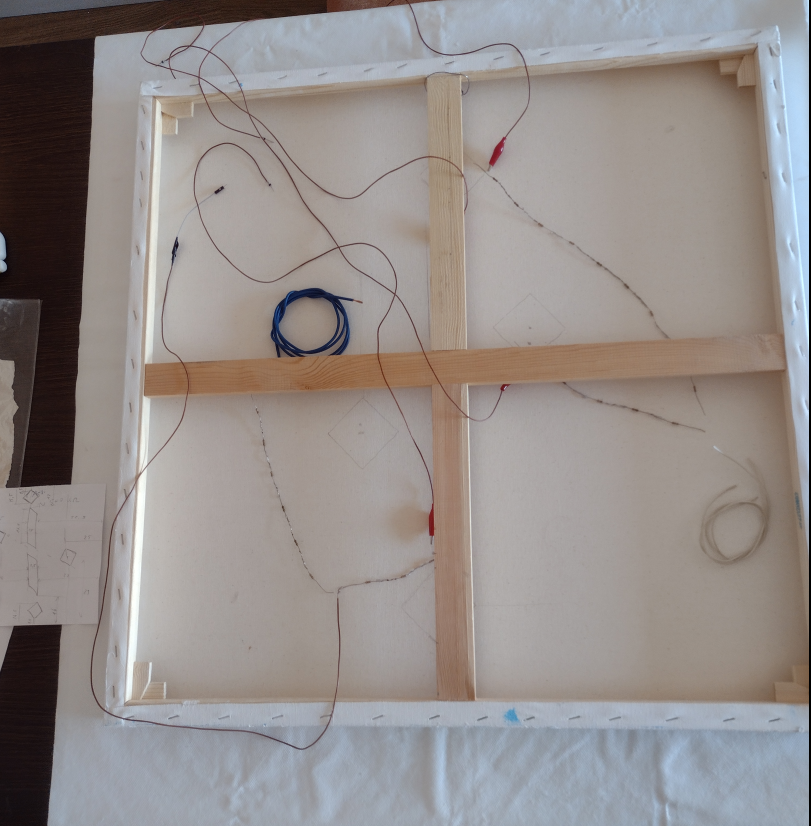
- Capacitive Sensors: Constructed from copper (or aluminum) foil pads strategically cut and placed on the back of the canvas.
- Resistors: 1 to 1.4 MΩ resistors (optimized through testing) used in each sensor circuit to control sensitivity.
- Loudspeakers: Two 4-inch speakers (20-40 W, 4 Ω impedance) for audio output, mounted to the wooden back panel.
- Breadboard and Wires: Used for prototyping and connecting initial circuits. Cabling within the final assembly is managed for cleanliness and safety.
- Wooden Back Panel: Provides structural support and mounting points for electronic components behind the canvas, with a 3 cm gap to accommodate them.
2.2 Sensor Connections:
Each of the four capacitive sensors utilizes a shared "send" pin (Arduino pin 2) and an individual "receive" pin (Arduino pins 4, 6, 8, and 10). A 1.4 MΩ resistor is connected between the send and the respective receive pin for each sensor.
3. Capacitive Sensing Technology
3.1 Circuit Explanation:
The capacitive sensing circuit operates by measuring the time delay in an RC (resistor-capacitor) network.
- Send Pin: Outputs a pulsed signal to charge and discharge the capacitive sensor.
- Receive Pin: Monitors the voltage changes resulting from the charging and discharging cycles.
- Resistor (R): The 1.4 MΩ resistor controls the rate at which the capacitor charges. Optimization determined this value provided the best balance of sensitivity and stability.
- Capacitor (C): The capacitance is influenced by the aluminum foil sensor, environmental factors, and, crucially, the proximity or touch of a user.
Then a wooden cover has been mounted upon to host loudspeakers and boards.
3.2 RC Delay and Sensitivity:
The RC time constant (τ = R × C) dictates the charging and discharging speed. Changes in capacitance (C) due to interaction alter this time constant, which is detected by the Arduino. Sensitivity was fine-tuned by adjusting the resistor value and the sampling rate within the CapacitiveSensor library. The aluminum foil sensor area of approximately 40 square centimeters was found to offer reliable detection.
4. Software Implementation
4.1 Arduino Firmware:
The Arduino Uno Rev.3 utilizes the CapacitiveSensor library by Paul Stoffregen to measure capacitance changes. The core initialization in the Arduino sketch is:
CapacitiveSensor cs_sensorX = CapacitiveSensor(sendPin, receivePinX); // For each sensor
Sensitivity is managed through the number of samples taken by the library. Threshold values for sensor activation were determined experimentally via the Arduino IDE Serial Monitor to ensure accurate detection and minimize false triggers.
4.2 Raspberry Pi Software:
A Python program running on the Raspberry Pi 4 Model B is responsible for processing sensor data received from the Arduino and triggering audio playback. Key features include:
- Serial Communication: Establishes communication with the Arduino over USB to receive sensor readings.
- Threshold-Based Activation: Detects sensor activation when received values exceed auto discovered thresholds.
- Debouncing: Implements a minimum two second delay between successive activations of the same sensor to prevent rapid re-triggering.
- Randomized Sound Selection: For each of the four sensors, the program intelligently selects one of several distinct sound samples from a corresponding folder. The sounds were created using sustained electric guitar recordings and other digital instruments to provide sonic variety.
- Parallel Playback: Allows for the simultaneous playback of sounds triggered by multiple sensor activations.
4.3 Arduino Interface & Event Manager
The Arduino Interface plays a crucial role in bridging the physical sensing hardware with the higher-level software logic running on the Raspberry Pi. It collects raw capacitive touch data from the sensor electrodes mounted behind the canvas and transmits meaningful interaction events to the main system.
The Arduino aggregates CapacitiveSensor data and periodically transmits it over a USB serial connection to the Raspberry Pi. A custom Python module on the Raspberry Pi acts as a listener and parser for this serial data stream. The module maintains a queue of recent readings and applies event detection logic to identify new touch events, sustained contact, or release events.
To ensure responsiveness and avoid false triggers, the system employs a hysteresis mechanism and configurable thresholds. For example, a touch is only registered if the measured signal exceeds a given activation threshold for a sustained number of readings. This reduces noise and ensures reliable operation even in environments with fluctuating electromagnetic conditions.
Once events are detected, they are forwarded to the Event Manager, a central coordination module responsible for triggering corresponding actions within the system. These actions include activating sound playback through the Audio Engine, forwarding touch events trhough websocket, or logging interaction data.
Beyond simple event forwarding, the Event Manager also performs adaptive learning based on user interaction patterns. Earlier versions of the system employed adaptive Markov models to infer probabilities of sequential gestures and transitions over time. This probabilistic model enabled context-aware reactions, anticipating likely next events and tailoring the sonic or visual response accordingly.
Current development explores the use of Recurrent Neural Networks (RNNs) as a more powerful approach for modeling and detecting complex, temporally extended interaction sequences. This opens the possibility of deeper temporal understanding of user behavior, enriching the perceptual and expressive potential of the artwork.
The modular design of the Arduino Interface and Event Manager ensures a clear separation between low-level hardware communication and high-level behavioral logic. This makes the system maintainable and extensible, so new sensor types or behaviors can be added with minimal impact on the overall architecture.
5. Mounting and Running
In "Echo of Lines", four capacitive sensors, made from aluminum foil pads, are mounted on the back of the canvas using adhesive to ensure they remain flat and secure. A non-conductive layer is placed between the foil and the canvas to prevent unintended triggers due to external electrical interference. The sensors are connected to the Arduino as described in Section 2.2.
All electronic components, including the Arduino, Raspberry Pi with HiFiBerry Amp2, and loudspeakers, are securely mounted to a wooden back panel positioned behind the canvas. The loudspeakers are fixed using screws within circular recesses for stability. Cabling is carefully managed to ensure a clean and safe internal layout, with easy access for potential maintenance.
Initial testing with a single sensor confirmed the successful detection of capacitance changes with fast and consistent readings. Subsequent testing with four sensors demonstrated the system's ability to detect individual sensor activations without interference. Threshold calibration ensured reliable responsiveness and minimized false positives.
This interactive Sounding Canvas represents the fusion of art and technology, offering a dynamic platform for creative expression. It exemplifies the potential of collaborative efforts between humans and AI in the realization of artistic and technical visions.
6. Communication Between Canvases
A unique and powerful aspect of the Sounding Canvas series is its ability to communicate across multiple artworks, creating a networked, collaborative experience. This inter-canvas communication is facilitated by a central Python server that acts as a hub for all connected Sounding Canvases.
6.1 WebSocket-Based Connectivity
Each individual Sounding Canvas establishes a persistent connection to the Python server using WebSockets. WebSockets provide a full-duplex communication channel over a single TCP connection, allowing for real-time, low-latency data exchange between the canvases and the server. This is crucial for the responsive and synchronous interaction desired across the networked artworks.
6.2 Routing Touch Events
When a user interacts with a specific Sounding Canvas (e.g., touches a sensor), the following communication flow occurs:
- Event Detection: The touched canvas detects the sensor activation and processes it locally (as described in the "Software Implementation" section).
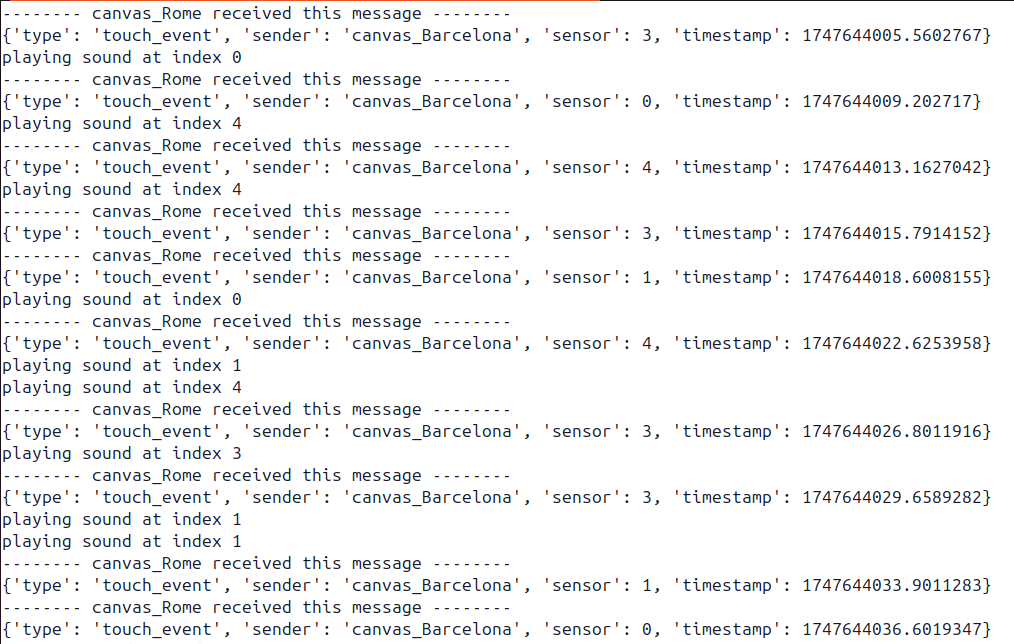
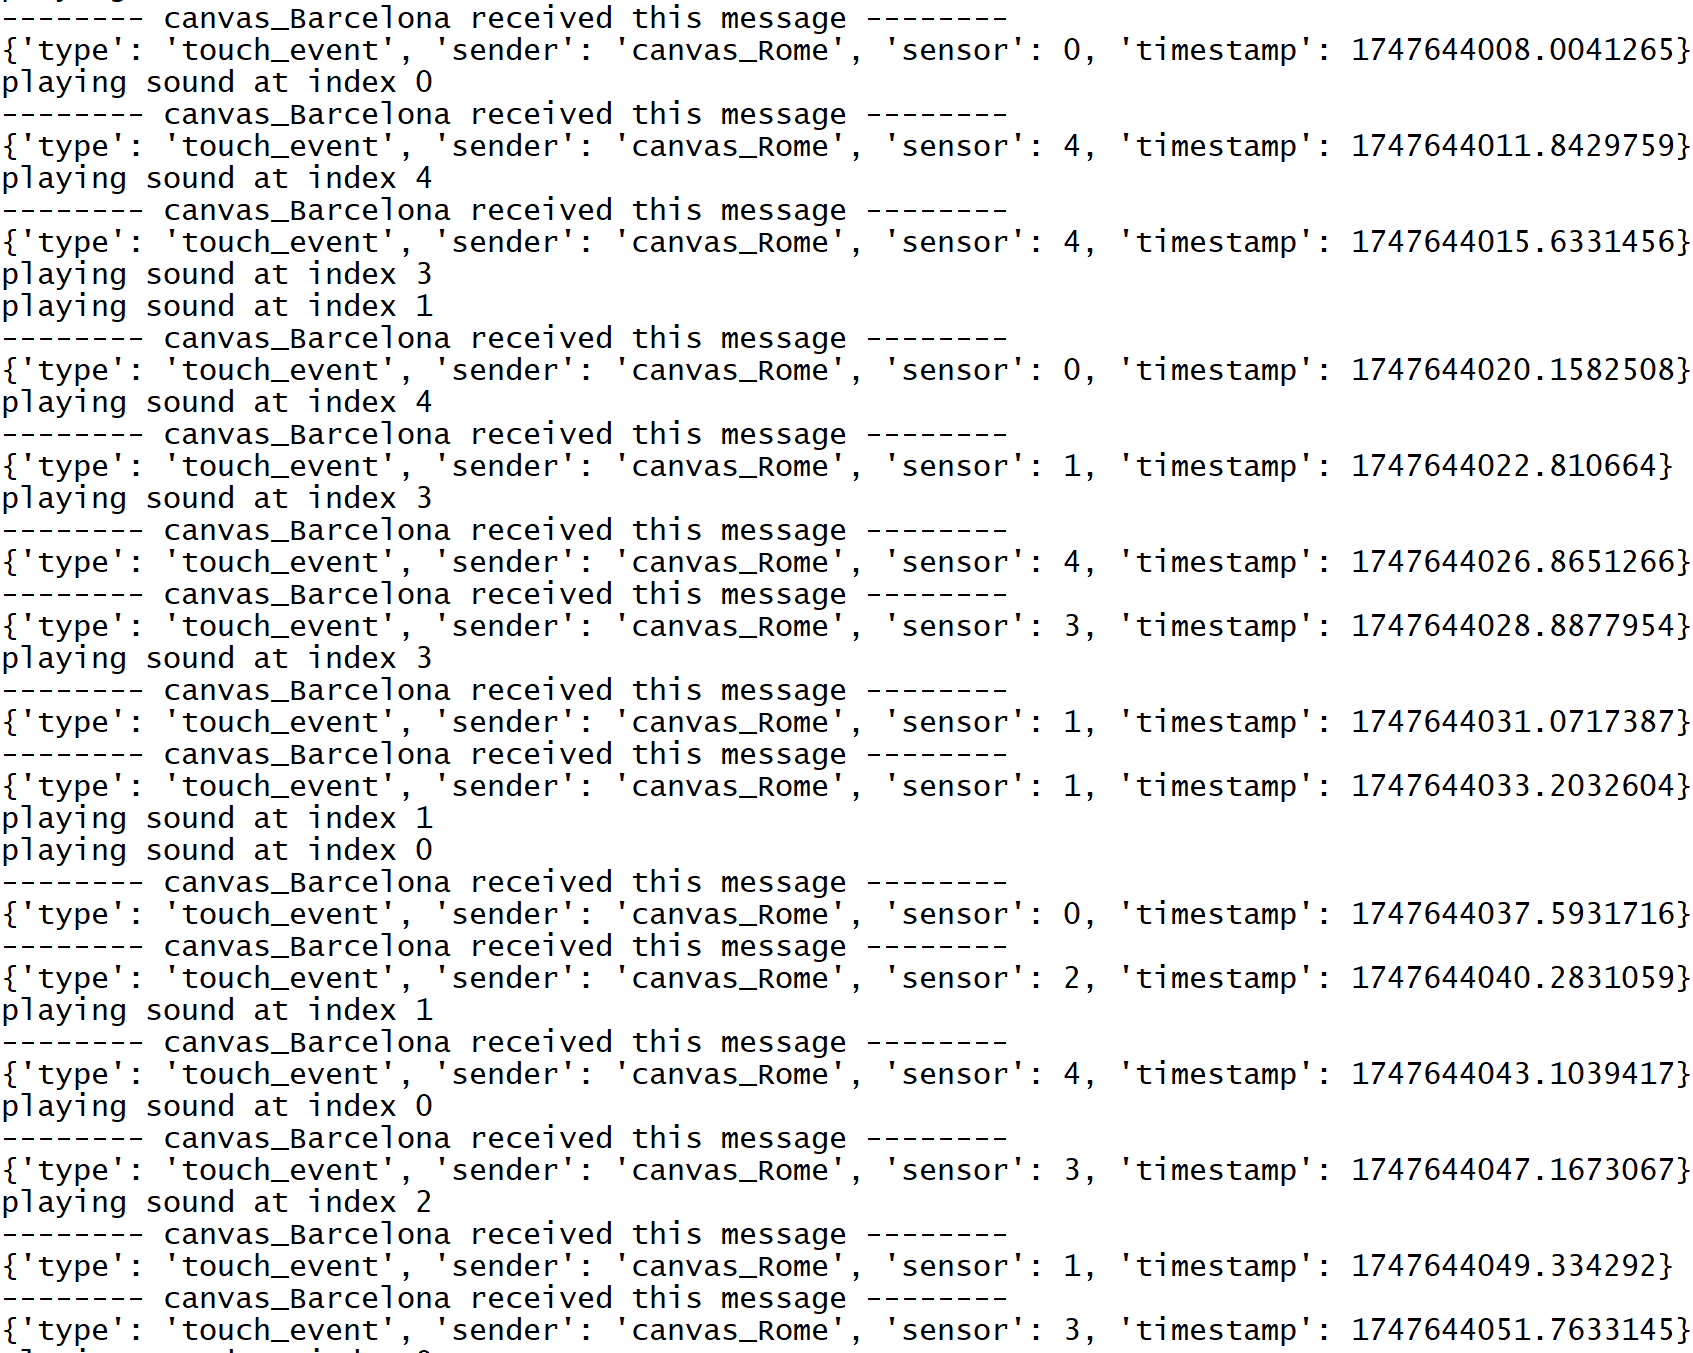
- Event Transmission to Server: The canvas immediately sends a message to the central Python server via its established WebSocket connection. This message contains information about the touch event, such as the canvas ID and the activated sensor.
- Server Routing: Upon receiving a touch event from any canvas, the Python server acts as a router. It takes the incoming event and broadcasts it to all other currently connected Sounding Canvases. This ensures that every canvas in the network is aware of interactions happening on any other canvas.
- Reception and Response: Each receiving canvas processes the incoming event from the server. This allows for synchronized auditory responses across the entire network of artworks, enabling complex, multi-canvas compositions or shared interactive experiences.
This server-client architecture, powered by WebSockets, allows the Sounding Canvas series to transcend individual artworks, transforming them into a cohesive, interactive network where a touch on one canvas can resonate and influence the sonic landscape of all others.
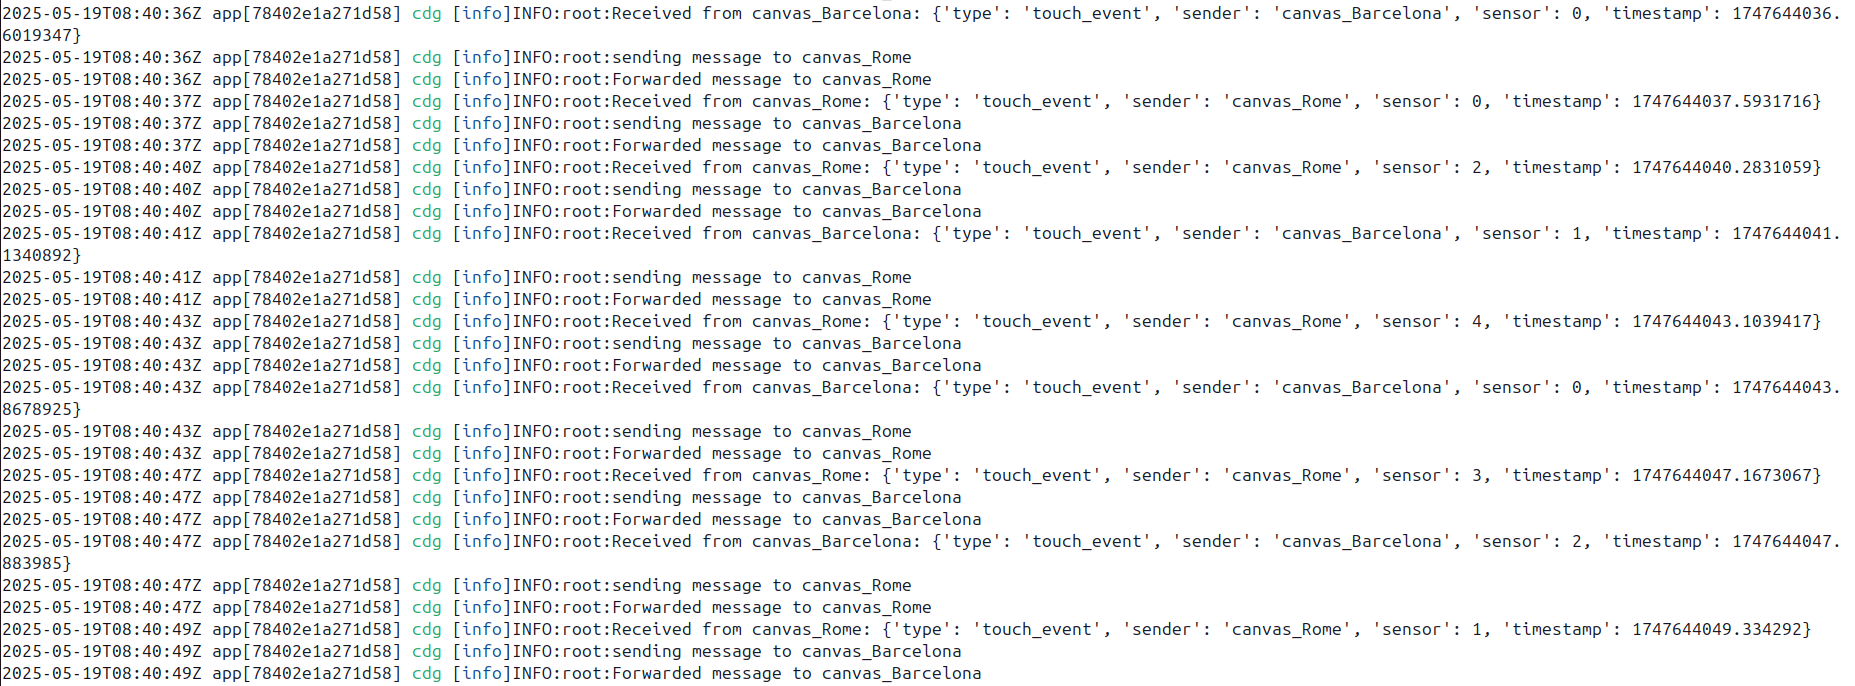
Communication Logs:
Below are terminal logs illustrating the communication flow between the canvases and the central server.
7. Distributed Minds
The Event Manager doesn’t just trigger a sound; it makes a decision. In our RNN-based setup, the canvas maintains an internal goal and selects the next sound to maximize the probability of a desired future touch. This is why we call it a Mind,it reasons over history and projects into what comes next.
By contrast, the Markov-based variant adapts transition probabilities on the fly, constantly rebalancing its expectations as interactions unfold. It chooses sounds according to these evolving adjustments, yielding a system that is responsive, lightweight, and context-aware.
Personalization is built in. Owners may contribute additional vectorialized information,from preferences to session context,so the RNN can shape behavior to a specific person or place. Over time, each canvas can embody a distinct identity while preserving core interaction principles.
The Event Manager also acts as a hub for inter-canvas communication. It can forward and receive events across the network, allowing multiple works to synchronize and influence one another. A gesture on one canvas can ripple across others,across a room or across the globe,so interaction is no longer confined to a single body or object, but becomes a shared, distributed experience.
In this networked ecology, the canvases’ Minds are not only local interlocutors,responding to the person in front of them,but also mediators between distant participants. They translate local touch into distributed resonance, weaving separate encounters into a collective conversation of gestures and sounds.